Set Up an Embedded Script
An embedded script is an app extension that injects an HTML code fragment into the DOM of your users' sites. This article guides you through adding a script to your app via the Wix Developers Center and making the necessary API call to embed it.
Add the script
-
Create a new app, or log in to an existing app in the Wix Developers Center.
-
Go to Extensions in the side menu under Build Your App.
-
Click Create Extension.
-
Find Embedded Script.
-
Click Create.
-
Name your extension. The name can only contain letters and the hyphen (-) character.
-
Select a Script Type:
- Essential: Enables site visitors to move around the website and use essential features like secure and private areas crucial to the functioning of the site.
- Functional: Remembers choices site visitors make to improve their experience. For example, language.
- Analytics: Helps site owners understand how visitors use their website by providing statistics, such as which pages they visit, and by identifying errors and performance issues.
- Advertising: Lets site owners collect information to help market their products, such as data on the impact of marketing campaigns or re-targeted advertising.
Site owners can allow visitors to choose whether to opt out of cookies and 3rd-party scripts. Sites check the script type against the user's consent settings to determine whether to run the script.
Note: An embedded script can't be saved without a type. If your script falls into more than 1 type, choose the option closest to the bottom of the list above. For example, if your script has Advertising and Analytics aspects, choose Advertising as its type. It's unlikely that you'll need to mark it as Essential. If you think you need to use this, please get in touch with us.
-
Write the custom code to embed, including any relevant dynamic key parameters. For efficiency, we strongly recommend loading the code from an external source so that you can edit the script on the external platform instead of within the extension. This ensures that changes, except for changes made to dynamic parameters, are automatically reflected across all app versions without needing individual reviews.
-
Set up a dashboard page in the Wix Developers Center. This lets users set up the embedded script and customize it later on.
-
Generate an Access Token. You'll need OAuth access set up for this to work.
Embed the script
To embed the script, you need to make a POST request to the Embed Script endpoint. This request must be made each time a site installs your application. To ensure the request is made during installation, we suggest including the call to the Embed Script endpoint as part of the OAuth flow.
-
If your script includes dynamic parameters, include them in the request body under the
parameterskey:Copy1{2"properties": {3"parameters": {4"<your-key-1>": "<your-value-1>",5"<your-key-2>": "<your-value-2>"6}7}8} -
If your script doesn't include dynamic parameters, make the call with the following request body:
Copy1{2"properties": {}3}
Note: Make sure to include an Authorization header with the access token generated in the previous section.
Embed multiple scripts
To include multiple embedded scripts in your app, you must specify a componentId in the request body sent to the Embed Script endpoint.
For example:
1{2 "properties": {3 "parameters": {4 "<your-key-1>": "<your-value-1>"5 }6 },7 "componentId": "<your-component-id>"8}
Warning:
If your app only has 1 embedded script, don't pass the componentId in the request body. This action could lead to your app breaking in production. The componentId is only relevant for apps with more than 1 embedded script.
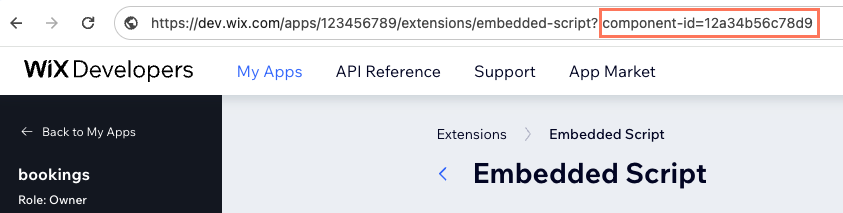
The componentId can be found within the URL of the embedded script page in the Wix Developers Center:
Test your app
It's important to test your app on your site to make sure that everything's connected and working properly. If it is, you should see your script injected to the site with the appropriate parameter in place.
To learn how to test your app, see App Checks and Testing Guide.
Note:
Embedded script apps can only be added by the owners of Premium Wix sites with connected domains and a valid SSL certificate.If you want your embedded script app to be available to the owners of free Wix sites, you need to make a request.
Dynamic key parameters
You may choose to embed dynamic parameters in your script, if you have any custom keys per user. For example:
1<script id="my-script" src="https://cdn.example.com/pixel.js?id={{KeyName123}}" async='true'></script>
Dynamic parameters must be:
- Wrapped in double curly braces.
- Within a quote (") in order to avoid code evaluation.
- Set using the Embedded Scripts API.
Important: If you add, remove, or change a dynamic key, users must update your app to receive the latest version of the embedded script.
Analytics
You can use embedded scripts to listen to predefined Wix events and report and listen to custom events.
Listen to a predefined Wix event
Add this code to your embedded script, and make sure to point to the events you're interested in. You'll also need to change 'app-ID' to your own unique App ID for the code to work.
1<script id='my_app_js' src='https://cdn.domain.com/pixel.js?id={{pixel_id}}' async='true'></script> 2<script> 3window.wixDevelopersAnalytics.register('app-ID', function report(eventName, data) { 4 switch(eventName) { 5 case 'pageview':6 callMyPageViewFunction(); 7 break; 8 case 'addToCart':9 callMyAddToCartFunction(); 10 break;11});12</script>
Predefined Wix events
addProductImpression: When a user views a product.clickProduct: When a user clicks on a product.viewContent: When a key page is viewed.addToCart: When a user adds a product to the shopping cart.removeFromCart: When a user removes a product from the shopping cart.initiateCheckout: When a user starts the checkout process.startPayment: When a user starts the payment process.addPaymentInfo: When a user saves payment information.checkoutStep: When a user completes a custom checkout step.purchase: When the checkout process is complete.lead: When a user subscribes to a newsletter or submits a contact form.
Report a custom event
Call a trigger event, passing the following properties:
eventNameeventData/eventParams– an object with the data to be passed
1window.wixDevelopersAnalytics.triggerEvent(<'FORMSUBMIT'>, {name: <'TEST'>})
Report and listen to a custom event
Add this code to your embedded script, and make sure you point to your custom events. You'll also need to change 'app-ID' to your own unique App ID for the code to work.
1<script>2window.wixDevelopersAnalytics.register('app-ID', function report(eventName, data) {3  console.log('eventName: '+eventName);  4});5
6setTimeout(function(){ 7  window.wixDevelopersAnalytics.triggerEvent('newEvent', {eventName: 'eventName'})8}, 5000);9
10</script>
On-ready event
To make sure you aren't calling the SDK before it is fully initiated, here's an on-ready event you can listen to. You'll also need to change 'app-ID' to your own unique App ID for the code to work.
1window.addEventListener('wixDevelopersAnalyticsReady', registerListener)2
3function registerListener(){4  window.wixDevelopersAnalytics.register('app-ID', function report(eventName, data) { 5    console.log("New Event: "+eventName+" | Data: "+JSON.stringify(data))6});7};
Response data
The returned data will vary based on the specific event, but will always include the following:
isPremium: true if the site owner has a premium plan, false if they have a free plan.uuid: The site owner's unique ID in Wix.msid: The unique ID of the Wix Site.
Embedded script placeholders
Wix Stores provides two placeholders where you can inject your embedded scripts:

Below the product SKU, you should find:
1<div data-hook="details-placeholder"></div>
And, below the product page, you should find:
1<div data-hook="bottom-placeholder></div>
The placeholders are empty divs with data-hooks that allow you to add content to these specific page locations.
To inject data into one of these placeholders, append your DOM element to the relevant placeholder once the page is loaded.
Important: Make sure you append your DOM elements and don't replace the content in case other apps are using the same placeholder on a site.
Troubleshooting
If you encounter the MISMATCHED ANONYMOUS DEFINE() MODULES ... error, they happen due to either the embed being bundled AMD but defines an anonymous module, or the embedded script itself adds a script tag to the head containing an anonymous module.
Try the following fixes:
- For the embedded script itself, if it’s bundled AMD/UMD, declare only named modules.
- For scripts loaded by the embed, if the scripts are bundled AMD/UMD and the embed developer owns those scripts, declare only named modules.
- For scripts loaded by the embed, if the scripts are bundled AMD/UMD and the embed developer does not own the script, check if
requirejsexists on the window. If it does, load the script viarequirejsinstead of adding the script to to the<head>. This solution is suboptimal and may still cause race conditions resulting with errors.
For more information on this issue, check out this article.